

The 30-Minute Copilot Setup That Changes Everything
How agents, skills, and instructions layer together — and why the difference is categorical, not incremental.


I spent weeks using GitHub Copilot as a fancy autocomplete engine. Type a function name, wait for a gray suggestion, hit Tab, move on. It felt useful in the same way a spell checker feels useful -- helpful, but hardly transformative.
Then I found agents, skills, and custom instructions. Three primitives that turned Copilot from a reactive suggestion tool into a proactive pair programmer -- one that already knows my stack, my architectural opinions, and my coding standards before I type a single character.
The difference is not incremental. It is categorical. And the setup takes thirty minutes.
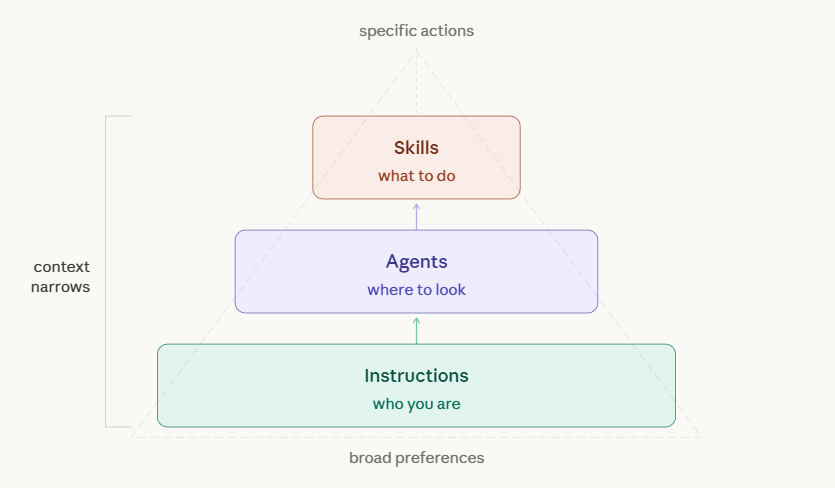
The Three Primitives
Copilot’s customization system rests on three concepts. Individually, each one is simple. Layered together, they compound into something far more powerful than the sum of their parts.
Agents determine where Copilot looks. Skills determine what Copilot does. Instructions determine how Copilot thinks.
Most developers use none of these. They open Copilot Chat, type a vague question, and wonder why the output feels generic. That is the equivalent of handing a contractor blueprints with no dimensions and then complaining about the walls. The AI is not bad. It is under-informed.
You do not need all three to get value. But the moment you layer them together, the returns multiply. Here is how each one works, why it matters, and how I set mine up.
Agents Are Context Switches, Not Chat Modes
Agents are specialized AI personas within Copilot, each wired to a different domain of your development environment. They are not cosmetic labels. They fundamentally change what context Copilot ingests before generating a response.
The four core agents are @workspace, @terminal, @vscode, and @github.
@workspace is the one you will use most. When invoked, Copilot scans your entire project structure -- file tree, dependencies, imports, patterns -- and uses all of it as context. Ask it “where should I add authentication logic?” and it reasons about your folder structure, existing middleware, and route organization before answering. Without the agent tag, Copilot has none of that context. It is just guessing.
@terminal operates in shell-land. It understands command-line output, environment variables, permission errors, and process management. Instead of pasting a stack trace into chat and asking “what went wrong,” you write something like this:
@terminal why is npm install failing with EACCES error?
Copilot inspects your terminal state, recognizes the permissions issue, and offers a targeted fix. The specificity is the leverage. A vague “how do I fix this error?” gets a generic answer. A scoped question through the right agent gets a precise one.
@vscode handles editor configuration -- format-on-save with Prettier, debug launch profiles, keybinding changes. It has full context on VS Code’s settings schema and your current workspace configuration, so it does not hallucinate nonexistent options or outdated JSON keys.
@github connects to your repository layer. Pull requests, issues, branch management, PR templates. It bridges the gap between your code editor and your project management workflow without context-switching to a browser.
The critical insight is simple: agents are context switches. Each one changes the lens through which Copilot sees your question. Using the wrong agent, or no agent at all, is leaving precision on the table. And precision is where the time savings live.
Skills Are Your Knowledge Vault
If agents are about where Copilot looks, skills are about what it does when it gets there.
Skills are reusable, composable instruction sets stored as markdown files in a .github/skills/ folder inside your project. Each file defines a specific workflow -- a recipe that Copilot follows when you invoke it with the #skill-name syntax in chat.
Here is a concrete example. Say you want every test file in your project to follow the same philosophy -- Jest framework, AAA pattern, mocked externals, 80% coverage targets. You create .github/skills/test-generator.md:
When generating tests:
1. Use Jest framework
2. Follow AAA pattern (Arrange, Act, Assert)
3. Include edge cases
4. Mock external dependencies
5. Aim for 80% coverage
Now when you type #test-generator for UserAuth.ts, Copilot follows these exact guidelines. No more explaining your testing philosophy every time you open a new chat window. The skill persists. It encodes your standards into something the AI can execute repeatedly, reliably, without drift.
Skills shine brightest when they encode institutional knowledge -- the stuff that normally lives in a senior developer’s head or a dusty Confluence page nobody reads. A code review skill can enforce your team’s PR checklist. A documentation skill can generate READMEs that match your company structure. A refactoring skill can follow your architectural patterns instead of inventing its own.
The key detail is that skills are project-specific. Your React frontend has different skills than your Python microservice. This is intentional. Context should be local, not global. When you switch projects, you switch skill sets. The friction is zero because the skills live with the code.
The Difference Between Agents and Skills
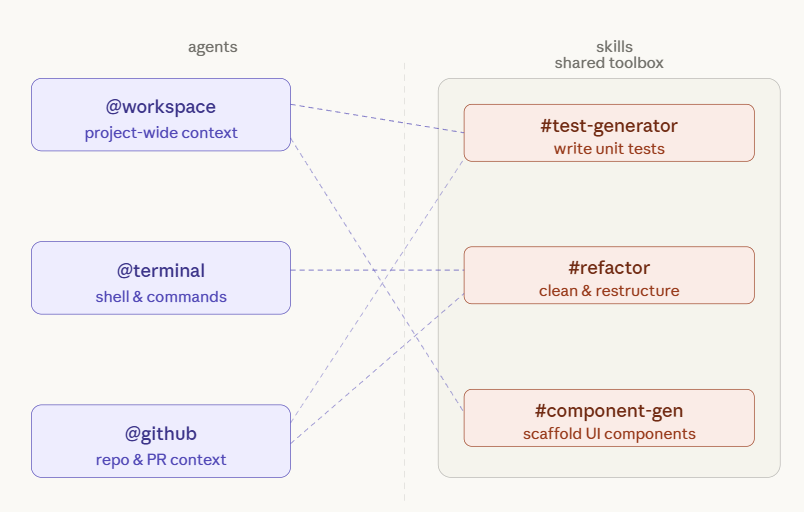
People use these terms interchangeably. They should not. If you want to build a system that scales, you need to understand the distinction between the Worker and the Toolbox.
Skills are the toolbox -- the persistent expertise, the SOPs, the proven frameworks you have spent time perfecting. Agents are the workers. They step into a role and reach into the toolbox to get the job done.
You might have ten skills in your library (test generation, component scaffolding, refactoring guidelines, documentation standards, API route templates, and so on) but only a handful of agents. Depending on the task, @workspace might pull from three different skills while @terminal only needs one. The skills belong to the project. The agents are the ones holding the tools.
This distinction matters because it dictates how you organize your system. Your .github/skills/ folder is the knowledge vault -- step-by-step procedures and reference implementations. Your agent invocations are ephemeral -- the right worker for the right job at the right moment.
By separating expertise from execution, you ensure that your institutional knowledge survives even if you swap models, change agents, or restructure your team. You build the library once. Your agents run on it indefinitely. That separation is what makes the system maintainable at scale.
Instructions Are Long-Term Memory
Instructions solve the most annoying problem in AI-assisted development: repeating yourself.
Every time you open a new Copilot chat session, the AI starts fresh. It does not know you prefer functional components over class components. It does not know your team uses Zod for validation and Winston for logging. It has no idea that you consider single-letter variable names a personal offense.
Instructions fix this. They are persistent context files that Copilot reads automatically, every session, without you asking. There are two types, and the distinction between them is where the real power lives.
Global instructions live in a single file at .github/copilot-instructions.md and apply to your entire workspace. This is where you declare your tech stack, your coding philosophy, and your non-negotiable standards. Here is what mine looks like for a Next.js SaaS project:
## Tech Stack
- Next.js 14 (App Router)
- TypeScript (strict mode, no implicit any)
- Tailwind CSS
- Prisma ORM
- PostgreSQL

## Coding Preferences
- Functional programming over OOP
- Async/await over promises
- Descriptive names (no abbreviations)
- Comments only for "why", not "what"
- Error handling on every async function

## Architecture Rules
- Server components by default
- Client components only when needed
- API routes in app/api/
- Database queries in server actions
- No prop drilling beyond 2 levels
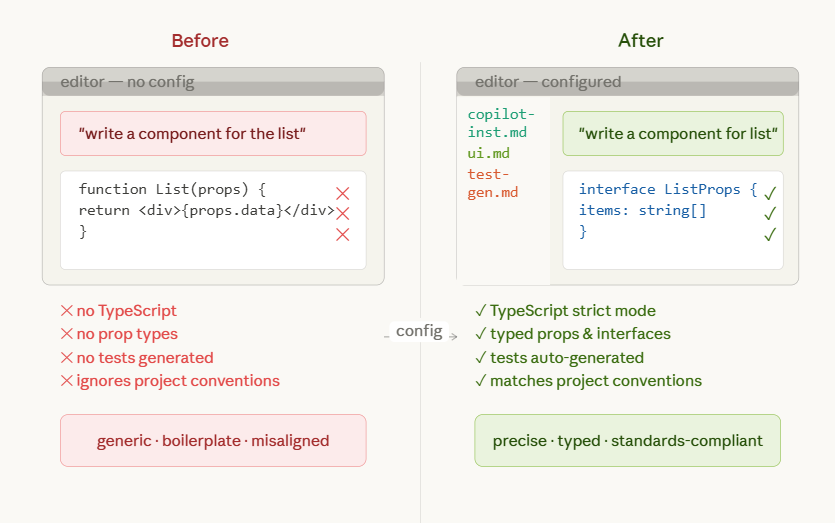
Notice the specificity. “Use TypeScript” is vague. “TypeScript strict mode with no implicit any” is actionable. Every vague instruction is a permission slip for Copilot to guess. Every specific instruction is a constraint that narrows the output toward what you actually want. The more precise your instructions, the fewer corrections you make downstream. That is direct ROI -- fewer review cycles, fewer rewrites, fewer “close but not quite” moments.
File-specific instructions live in a .github/instructions/ folder. Each markdown file targets a particular domain of your codebase, and Copilot reads the nearest matching file when you are editing code in that area. This is where you go granular.
For example, .github/instructions/api-routes.md might contain validation requirements and a full reference implementation:
For API routes:
- Always validate input with Zod
- Return proper HTTP status codes
- Include error handling middleware
- Log requests with Winston
- Add rate limiting
And beneath those rules, an example that Copilot can pattern-match against:
import { z } from 'zod'
import { logger } from '@/lib/logger'

const schema = z.object({
  email: z.string().email()
})

export async function POST(req: Request) {
  try {
    const body = await req.json()
    const validated = schema.parse(body)

    // Business logic here

    return Response.json({ success: true })
  } catch (error) {
    logger.error('API error:', error)
    return Response.json({ error: 'Invalid request' }, { status: 400 })
  }
}
When you edit an API route file, Copilot automatically reads this instruction file and applies those standards. You write the rules once. Copilot follows them in perpetuity.
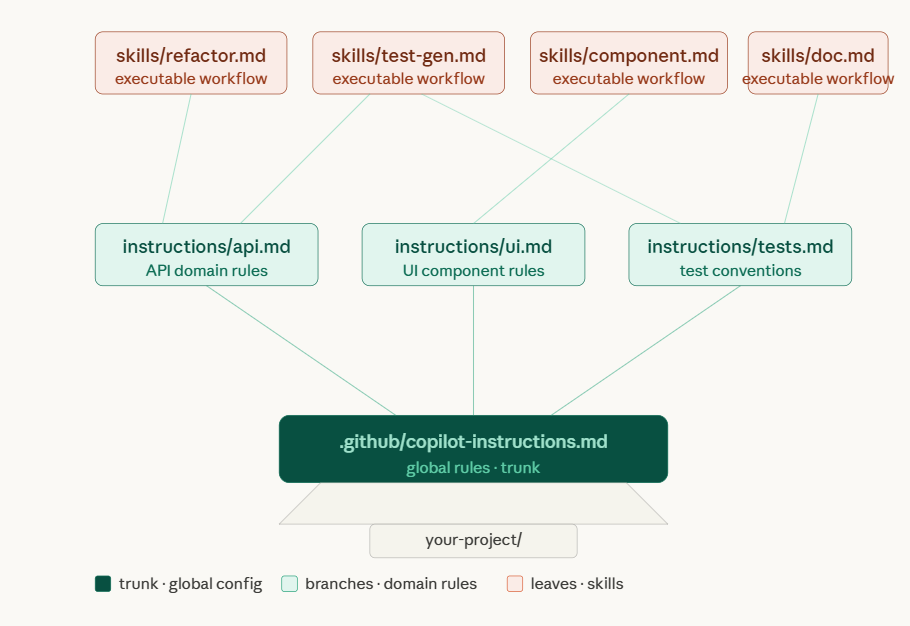
The layering is deliberate. Global instructions set the baseline. File-specific instructions override or augment for particular domains. You get broad consistency with surgical precision where it matters.
The Setup That Actually Works
After weeks of experimenting, here is the configuration I settled on. It balances thoroughness with maintainability, and it takes about thirty minutes from scratch.
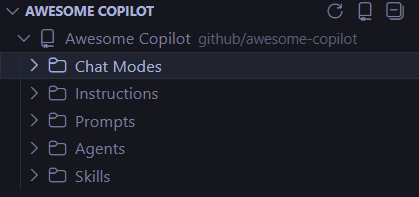
Start by installing the Awesome Copilot VSCode Extension. This is non-negotiable. It gives you a sidebar to browse, install, and manage skills without leaving your editor. It connects to the Awesome Copilot repository -- GitHub’s curated collection of community-built skills and instructions. Bookmark that repo. It is your skill library, and it is growing fast.
Next, create your instruction hierarchy. Your project’s .github folder should look like this:
your-project/
+-- .github/
|   +-- copilot-instructions.md
|   +-- skills/
|   |   +-- component-gen.md
|   |   +-- test-gen.md
|   |   +-- refactor.md
|   +-- instructions/
|       +-- components.md
|       +-- api-routes.md
|       +-- database.md
|       +-- tests.md
+-- .vscode/
    +-- settings.json
Start with the global instructions file. Write your tech stack, your preferences, and your architecture rules with maximum specificity. Then create two or three file-specific instruction files for the areas where you need the most precision -- usually API routes, database queries, and component patterns. You can always add more later. Start lean, iterate based on what Copilot gets wrong.
Then build your first skills. The #skill-creator skill, available from the Awesome Copilot extension, generates templates for you. Just ask:
@workspace #skill-creator create a skill for generating React components
This scaffolds a .github/skills/react-component.md file. A well-crafted component skill looks like this:
# React Component Generator

When generating React components:

1. Use TypeScript with proper prop types
2. Export as default
3. Include JSDoc comments
4. Follow this structure:

```typescript
interface Props {
  // props here
}

/**
 * Component description
 */
export default function ComponentName({ prop }: Props) {
  // component logic
}
If state is needed, use useState hooks
If side effects needed, use useEffect
Keep components under 200 lines
Now invoking `#react-component create a UserProfile card with avatar, name, and bio` produces code that matches your standards on the first try. No corrections, no back-and-forth, no "actually, we use functional components here, not class components." That elimination of review cycles is where the cost savings compound. Every round of feedback you skip is developer time reclaimed.

Finally, configure your editor. Add these baseline settings to `.vscode/settings.json`:

```json
{
  "github.copilot.enable": {
    "*": true
  },
  "github.copilot.editor.enableAutoCompletions": true
}
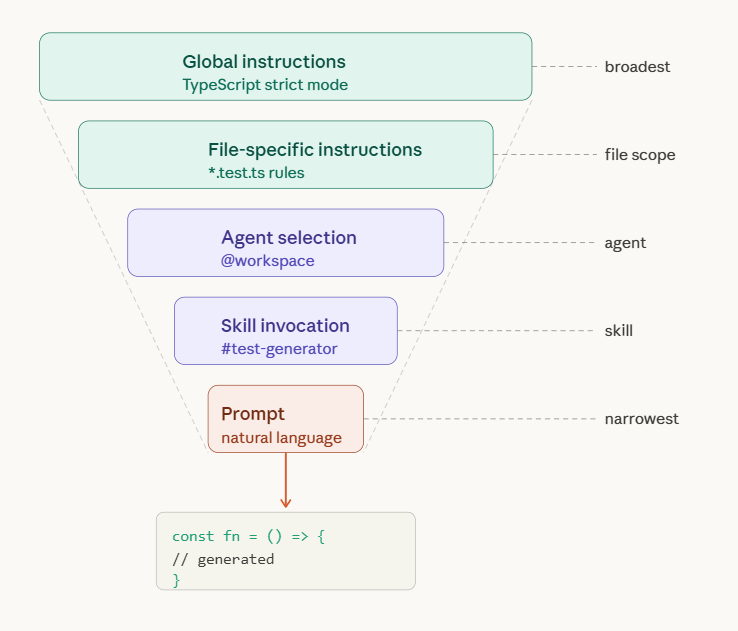
And then practice the agent-skill combination. This is where the compounding really begins. Instead of writing a bare prompt like “generate tests for UserService,” you write:
@workspace #test-generator create integration tests for UserService with database mocking
The @workspace agent gives Copilot your full project context. The #test-generator skill tells it exactly how you want tests structured. The natural language portion specifies the immediate task. Three layers of context, one precise output. The difference between this and a naked prompt is the difference between a rifle and a shotgun.
Going Deeper
Once the basics are running, three advanced techniques take your setup further.
Skill chaining lets you invoke multiple skills in a single prompt. When you need to refactor a service and immediately generate tests for the new implementation, you write:
@workspace #refactor #test-generator improve AuthService and add tests
Copilot processes both skills sequentially -- refactoring patterns first, then tests matching your testing standards. Two operations, one prompt, zero manual context switching. This is particularly powerful during large refactors where you want to guarantee test coverage keeps pace with structural changes.
Context injection means referencing specific files inside your instruction files so Copilot has concrete examples to follow, not abstract descriptions. Instead of describing your authentication pattern in prose, you point directly to the implementation:
## Authentication Pattern

Follow the pattern in `src/lib/auth.ts`:
- Use bcrypt for hashing
- JWT tokens expire in 7 days
- Refresh tokens in httpOnly cookies
Copilot reads both the instruction and the referenced file, then generates code that matches your actual implementation rather than a generic tutorial example. The output feels like it was written by someone who has been on your team for months, not someone who just read a blog post about the framework.
Conditional instructions handle the messy reality of real codebases. Not everything follows your latest standards. Some directories contain legacy code that works fine and would break if restructured. A file at .github/instructions/legacy-code.md can explicitly say:
This is legacy code. Do not refactor unless explicitly asked.
Maintain existing patterns even if they violate modern standards.
This prevents Copilot from “helpfully” modernizing code that nobody asked it to touch. It is a guard rail, and in production codebases, guard rails pay for themselves quickly.
The Layering Principle
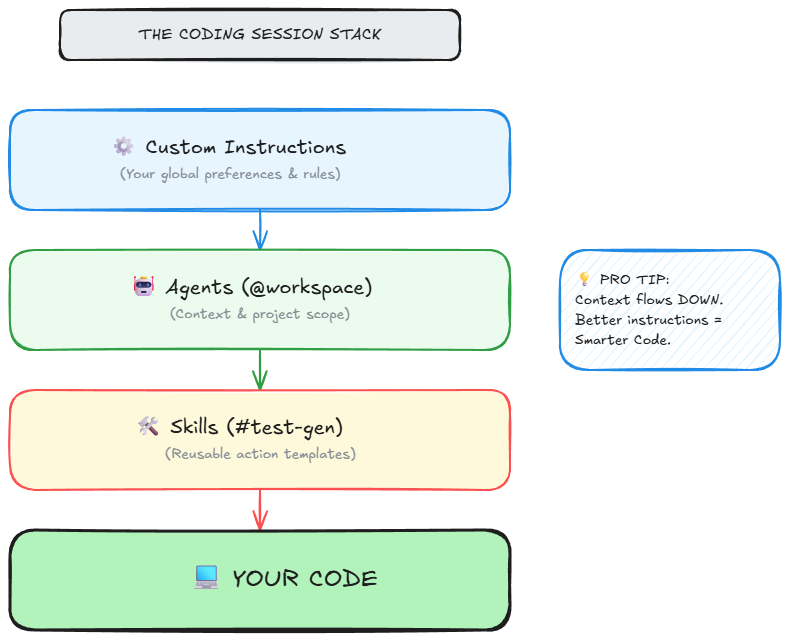
The real power of this system is not any single feature. It is the layering.
Context flows from broad to narrow. Your global instructions set the baseline -- tech stack, coding philosophy, architectural rules. Your file-specific instructions add precision for particular domains. Your skills encode repeatable workflows. Your agent selection determines the scope of context. And your natural language prompt provides the immediate task.
Each layer narrows the space of possible outputs. By the time Copilot generates code, it has been guided through five layers of context. The result is not generic boilerplate. It is code that looks like yours.
One more thing worth emphasizing: version control your configuration. Commit .github/copilot-instructions.md, .github/skills/*.md, and .github/instructions/*.md to Git. These files are institutional knowledge. When a new developer joins your team, they inherit your AI configuration alongside your codebase. Their Copilot immediately speaks your architectural language. That is onboarding leverage you cannot get any other way.
And iterate. Your first instructions file will not be perfect. After a week of use, review Copilot’s suggestions. Note where it drifts from your standards. Update the instructions to close the gap. The feedback loop is fast, and each iteration compounds. By week three, Copilot will feel like a teammate who has been reading your code reviews for years.
What Thirty Minutes Buys You
The biggest takeaway from all of this is deceptively simple: Copilot is only as good as your configuration.
Out of the box, it is a helpful autocomplete tool. With proper instructions, agents, and skills, it becomes a force multiplier that pays for itself in the first week. I went from “AI autocomplete” to “AI pair programmer who knows my entire stack, my preferences, and my team’s standards.”
The math is straightforward. If configuration saves you even twenty minutes per day in reduced review cycles, eliminated back-and-forth, and fewer “close but wrong” suggestions, that is over seven hours per month. At any reasonable hourly rate, that dwarfs the cost of a Copilot subscription. And unlike most productivity tools, the value increases over time as your instruction files get sharper.
You are either configuring your tools to work for you, or you are doing the same work twice. There is no middle ground.
Resources and Video Guides
Documentation
Video Tutorials (In Order of Recommended Viewing)
GitHub Copilot Agents Overview - Introduction to what agents are and how they work
Understanding Custom Instructions - Deep dive into global and file-specific instructions
GitHub Copilot Skills Explained - How to create and use skills
Advanced Copilot Configuration - Best practices and advanced techniques
Skill Chaining & Workflows - Combining multiple skills for complex tasks
Complete Setup Guide - End-to-end configuration walkthrough
This essay reflects my experience learning Copilot’s advanced features. Your stack is different, but the framework applies regardless of what you build with.